Windows Live Mail: Adding and Configuring your Email Account
Section 1: Adding a New Account
Section 2: Configuring your New Account Server Settings
Section 3: Modifying Settings on an Existing Account
Section 1: Adding a New Account
•
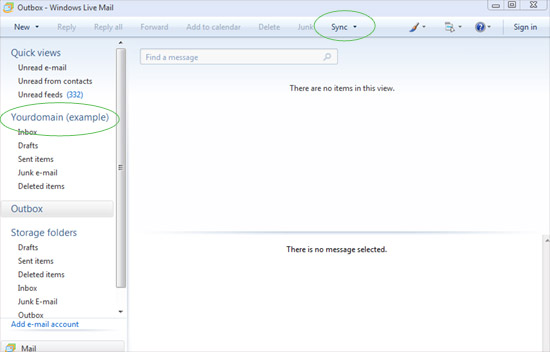
Open Windows Live Mail
•
From the menu folder pane on the left, click
Add e-mail account.
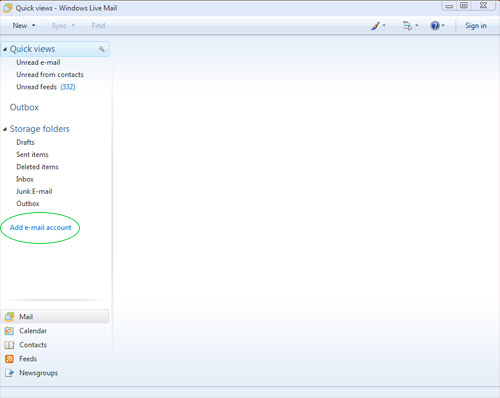
•
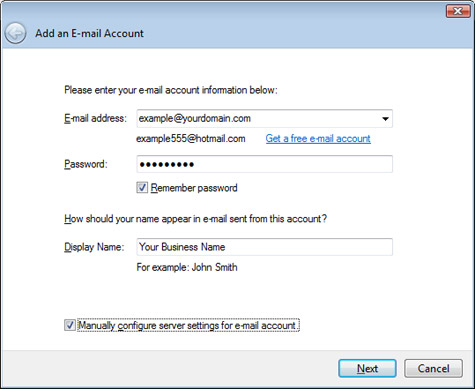
The Add an E-mail Account dialog box will open.
•
Enter the requested information in the Email address, Password and
Display Name Fields.
(Use the password we've provided for you.)
•
Select the checkbox for both:
- Remember Password
and
- Manually configure server settings for e-mail account.
•
Click the Next button
Section 2: Configuring your New
Account Server
Settings
•
Select POP3 from the drop down menu to select your incoming
mail server type.
•
Type your domain name in as the Incoming server.
•
The incoming server port should be 110.
•
Log on using Clear text authentication
•
Type your account name--the one we provided for you--in the Login ID field.
If something is already entered in the Login
ID field, confirm it matches the account name
we gave you and correct it if it
doesn't.
• Type your domain name in as the Outgoing Server.
•
The outgoing server port should be changed to 587.
• Select My outgoing server requires authentication.
• Click the Next button
• You should remove a message stating
that you've successfully added the information required.
• Click the Finish button to close the dialogue box and return
to your inbox.
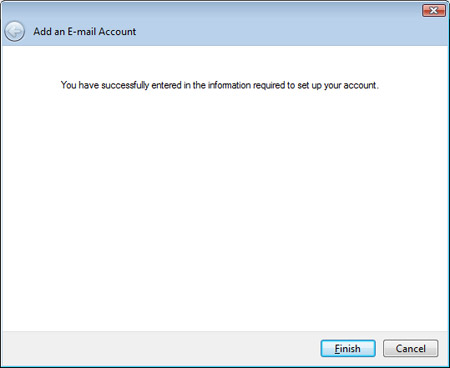
•
You should now see your account listed in the folder pane
•
Click the Sync button to check for new mail.
Section 3: Modifying
Settings on an Existing Account
•
Open Windows Live Mail
•
Locate your email account in the folder pane on the left.
•
Right-click the account name.
•
Select Properties from the menu that appears.
•
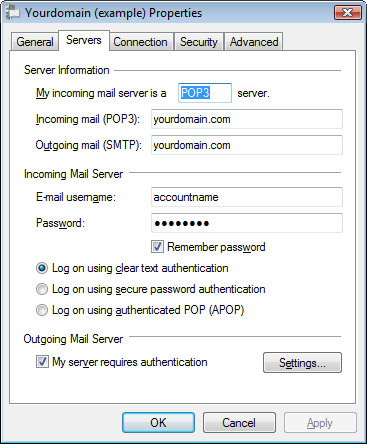
The Properties dialog box will appear. There are five tabs
across the top; click on the one labeled Servers.
•
Make or change the settings as indicated:
•
Select POP3 from the drop down menu to select your incoming
mail server type.
•
Type your domain name in as the Incoming mail (POP3).
• Type your domain name in as the Outgoing Server.
• Enter or confirm your email username and password
• Verify the Remember password checkbox is
selected
•
Select Log on using clear text authentication
•
Select My outgoing server requires authentication.
• Click the Settings...
button
•
Verify the radio button next to Use same settings as my
incoming mail server
is selected.
•
Click OK
•
You'll return to the Properties dialog box.
•
The tab on the far right-hand side is labeled Advanced.
•
Click on the Advanced tab.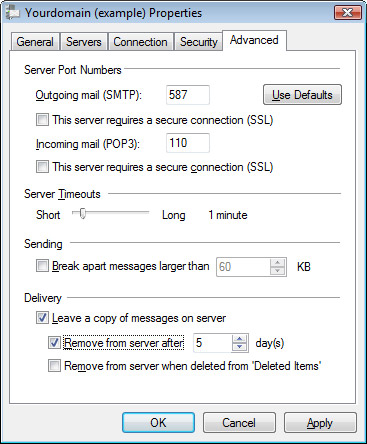
•
Outgoing mail port should be 587.
•
The Incoming mail port should be 110.
•
Under the Deliver heading, check Leave a copy of
messages on server.
•
Check the box labeled Remove from server
after 5 days.
(Important:
If you have this email account
setup on multiple
computers or devices, select this checkbox only on one of the
computers, which ever
is your primary source for checking email.)
•
Click OK.
• Type your domain name in as the Incoming server.
• The incoming server port should be 110.
• Log on using Clear text authentication
• Type your account name--the one we provided for you--in the Login ID field.
If something is already entered in the Login ID field, confirm it matches the account name
we gave you and correct it if it doesn't.
• Type your domain name in as the Outgoing Server.
• The outgoing server port should be changed to 587.
• Select My outgoing server requires authentication.
• Click the Next button
• Click the Finish button to close the dialogue box and return to your inbox.
• Click the Sync button to check for new mail.
• Locate your email account in the folder pane on the left.
• Right-click the account name.
• Select Properties from the menu that appears.
• The Properties dialog box will appear. There are five tabs across the top; click on the one labeled Servers.
• Select POP3 from the drop down menu to select your incoming
mail server type.
• Type your domain name in as the Incoming mail (POP3).
• Type your domain name in as the Outgoing Server.
• Enter or confirm your email username and password
• Verify the Remember password checkbox is selected
• Select Log on using clear text authentication
• Select My outgoing server requires authentication.
• Verify the radio button next to Use same settings as my
incoming mail server is selected.
• Click OK
• Click on the Advanced tab.
• The Incoming mail port should be 110.
• Under the Deliver heading, check Leave a copy of messages on server.
• Check the box labeled Remove from server after 5 days.
(Important: If you have this email account setup on multiple
computers or devices, select this checkbox only on one of the
computers, which ever is your primary source for checking email.)
• Click OK.